

So your pride & joy has been painted, polished and launched. But it’s been a while since you’ve run through that mental checklist that all good skippers have committed to memory. Well here at SaltWaterDiesels we just love lists so don’t hit that start button just yet until you’ve gone through our extensive pre-season marine diesel checklist.
Marine Diesel Pre-Season Checklist
Before you start your engine:
- Coolant: remove cap on water tank and feel inside for water or coolant. Top up with distilled water and antifreeze if necessary.
- Oil in sump: remove oil dip-stick and wipe clean. Re-insert and pull out to ensure that oil is at the correct level. Smell the oil – if there’s any hint of fuel in the oil, then that will need to be investigated immediately.
- If your engine has them, enable the decompression levers and hand crank the engine to get the oil moving around the case before starting. Crank for about a minute and then disable the decompression levers one at a time. Check that the compression in each cylinder prevents you from cranking the engine.
- Is there oil in gearbox? Remove the gearbox dipstick and check the level and quality of the oil within.
- Have you filled up the greaser on your stern gland stuffing box? If not, get it topped up now.
- Do you have a Volvo rubber stuffing box? If so, it needs greased and burped.
- Have you filled the fuel tank? At the very least, check that you have adequate fuel for your maiden journey to your dock.
- Fuel supply control: make sure that all the valves in your fuel supply lines are in the open position. Even better, bleed a little oil from your favorite bleed point and let any water out of the drain point on the primary fuel filter.
- Starter motor belt: check that any drive belts around the engine are firm. Don’t twist them! They should deflect by the width of your thumb along the longest side (25 – 30mm) with some pressure. Adjust if too lose or tight.


Engine Belts
The crankshaft, usually the pulley wheel at the bottom of the engine, usually drives the belts. Belts transfer power to other pulley wheels on the engine and drive the alternator, to provide power to the batteries, and the water pump to circulate cooling water around the engine.
If the belt is too loose:
- The alternator may be inefficient resulting in uncharged batteries.
- The water-circulating pump may be inefficient resulting in the engine running hotter.
- Regularly checking gauges such as the voltmeter and engine temperature will highlight both of these problems.
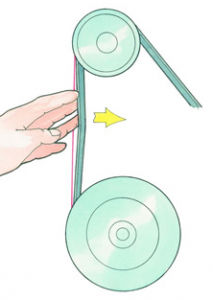
A slipping or loose belt is often visually indicated by black belt dust around the engine near the pulleys. There are two common types of belt; flat belts or ‘V’ shaped. Consult your owner’s manual about their accurate testing and adjustment, but a common rule of thumb to check adjustment is:
- V Belts can be deflected by about 12mm and no more.
- Flat belts should be able to twist through 90 degrees and no more.
- A belt adjusted too tight can put excess pressure on the pulley wheel shaft and increase wear on the shaft bearings of the pulley wheels.
- Battery: look at the batteries and ensure the connections are solid and there’s no serious corrosion or leakage. Check the charge level with a voltmeter. Using a clean rag, dry up any moisture from the battery bank.
- Leaks of any type: look around the area below the engine. Ensure there are no liquids such as water, oil or fuel in the bilge. Always keep the engine basin very clean so leaks show up easily. A top tip is to put a pet training sheet out beneath the engine. This will soak up any leaks and keep your bilges clean.
- Is everything free to move? Use a good torch and have a thorough visual inspection and, if you have access, rotate the prop shaft by hand. Has anything fallen in such a way that it will foul the engine belts, flywheel or stern gear when the engine is started?
- Electricity: make sure all the wires are secure and there are no lose ends.
- Strainers: check the raw water strainer. Ensure it is free from debris. Use gloves as some sea creatures are hard to see and can sting if you touch them.
- Sea-cocks: make sure that your engine sea-cocks are open. While you’re at it, make sure that your ball valves are smooth to operate. If you still have gate valves, make sure the are smooth to open and close and make a note to change them next winter. Do you need to prime the raw-water impeller at the beginning of the season? If so, do that now.
- Is the exhaust system secure and all connections tight? Was anything removed from the exhaust system over the off-season?
- Did you stuff your exhaust with a rag over the winter to keep cold air and wildlife out? It’s not a bad idea but if you did, make sure the exhaust is clear now.
- Inspect the air supply and air filter to ensure they are clean from any fluids or dust. Remove the air filter and if it’s a foam type (Yanmar) check that the foam has not deteriorated. Replace if necessary.
- Log: enter your engine hours and review maintenance logs.
- Is the engine in gear? If so, select neutral.
Now start your engine:
- Note how long the engine took to start in your log book.
- Check the exhaust visually – is it producing smoke and is cooling water being expelled?
- When it starts, let it idle and listen carefully for any unusual noises. Are all cylinders firing properly?
- Visually inspect the fuel supply circuit, the cooling water system and the new engine oil filter for any leaks.
- Finally, make sure that you run the engine for a good 30 minutes before putting yourself in a potentially hazardous situation. These engines use very little diesel fuel (especially when ticking over) and any air that has been introduced to the fuel supply over the winter might take a while to get through to the injectors. If it does, the engine will misfire and may even stop. After your 30 minute run-in, check the fuel filters and supply lines again for any sign whatsoever of leaks.
- Before you slip your lines, make sure that the engine will easily shift in and out of gear. Try both forward and reverse gears.
- When you’re finally underway, make sure that the engine will reach rated rpm at full open throttle underway in forward gear. Check that throttle movement is smooth throughout the range.