
PLEASE NOTE: THIS ARTICLE IS STILL UNDER CONSTRUCTION
A note on fuel filter terminology before we begin. Not everyone agrees with the following but it seems to be the most popular convention so we stick with these primary and secondary definitions throughout this article (and the entire site for that matter).
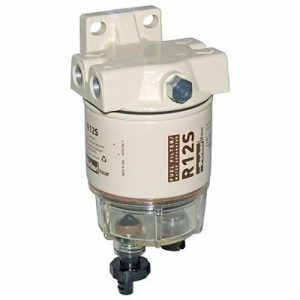
- The primary fuel filter in standard marine diesel engine installations is the one closest to the fuel tank. It is the one responsible for filtering most of the particles out of the fuel as well as, importantly, any water that is mixed in. Normally, they are 10 micron filters. They typically have an inspection bulb where water or sludge can be observed. This should be changed every year for typical use. It is often known as a Racor-type filter, as in the example shown.
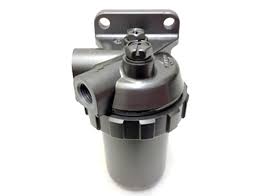
- The secondary fuel filter is the smaller one built in to the engine itself. Some folk call this the engine-mounted filter. Normally, they are 2 micron filters Many owners who regularly change their primary fuel filter (so every year for moderate users) feel that every 3 years is a good interval to change these filters.

Step 1: Prepare to spill some diesel
You should wear latex protective gloves from this point on. Diesel fuel can cause the skin to become irritated, dry and cracked.
Position a receptacle under the filter to catch spilled fuel. An old food container with a lid is good and putting kitchen roll (or blue roll) in the base of the container will help prevent spills.
Step 2: Loosen and remove the retaining ring
Unscrew the retaining ring. If the retaining ring is tight, or in a difficult to access aspect, try using a band spanner (which are also great for oil filter removal on this engine). Do not be tempted to use a Stillson type wrench on this as it may damage the retaining ring.
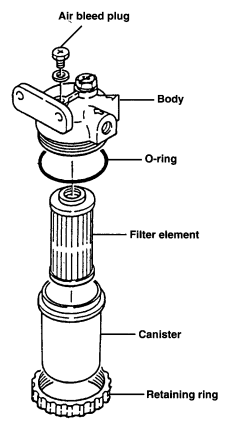
Next drop the canister and filter element into the waiting receptacle. Locate the O-ring noting that it may remain on the filter body or on the canister. Place it in the receptacle along with the canister.
Step 3: Remove and Discard the Filter Element
Remove the filter element from the canister. Inspect and if it is dirty or damaged, discard the element. If it’s been 3 years since it was last changed, then discard it even if it looks fine. Remember, it is filtering out particles of 2 microns (or 2 millionths of a meter in diameter) – you may not see them!
Step 4: Clean the canister
Clean the canister in clean diesel fuel. Remember, the fuel supply at this point has already been through the primary filter. Do not wipe the inside of the canister with any type of cloth or tissue paper. If particles are introduced here they could make their way downstream to an injector and potentially cause a problem there. Just rinse it in a clean jar in clean diesel fuel.
Step 5: Install the new filter element in the canister
Make sure that ….
Step 6: Install a new O-ring
The dimensions of the O-ring to seal the canister are …
Step 7: Install the canister on the filter body, then install the retainer ring and tighten it hand-tight.
Put a bit of light oil on the O-ring before fitting to prevent it distorting while tightening. Do not be tempted to use the band spanner to tighten this. Let the O-ring do it’s job by not over-tightening.

Step 8: Bleed any air out of the fuel system
Loosen the air bleed plug on top of the fuel filter body. Remember, it the smaller screw towards the rear of the unit. Make sure the fuel tank valve is open, then operate the primer lever (lift pump) on the fuel transfer pump. Operate the lever while observing the fuel emitted around the M10 bleed plug. Air will be emitted along with the fuel. Stop operating the lever when the fuel is free of air, then tighten the air bleed plug. Use a rag to clean any spilled fuel from the housing.
TECHNICAL DETAIL: Yanmar M10 Torque Requirements: 44-50 Nm
Top tips
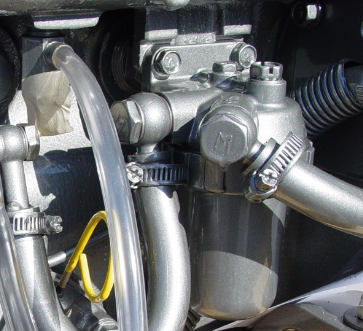
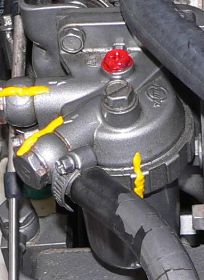
After removing the filter housing and the banjo bolts a good practice is to tighten back up to the required torque and then paint with torque seal paint as shown. Tippex correction fluid does the same job. Then, if the bolts ever vibrate loose, it will be easily spotted.
Note the air bleed screw marked red in this photo – counter-intuitively it’s the further away bolt (of the two) and usually harder to reach but the bleed screw has a groove cut in it to make it more effective at bleeding air out. The larger bolt head is simply a plug with no stated purpose although it can also be used to bleed air if you need. The reason for marking it in red is so that it can be quickly identified in an emergency. Some owners mark all bleed screws on their fuel path red for this reason.
Now run some fuel through the engine
Finally, make sure that you run the engine for a good 30 minutes before putting yourself in a potentially hazardous situation. These engines use very little diesel fuel (especially when ticking over) and any air that has been introduced to the fuel supply might take a while to get through to the injectors. If it does, the engine will misfire and may even stop. After your 30 minute run-in, check all the banjo bolt fuel connectors and the filter housing for any signs of leaks.